
Project Manager
The Project Manager window is displayed when you open a project from the Welcome window or by using the menu item.
Project File Structure
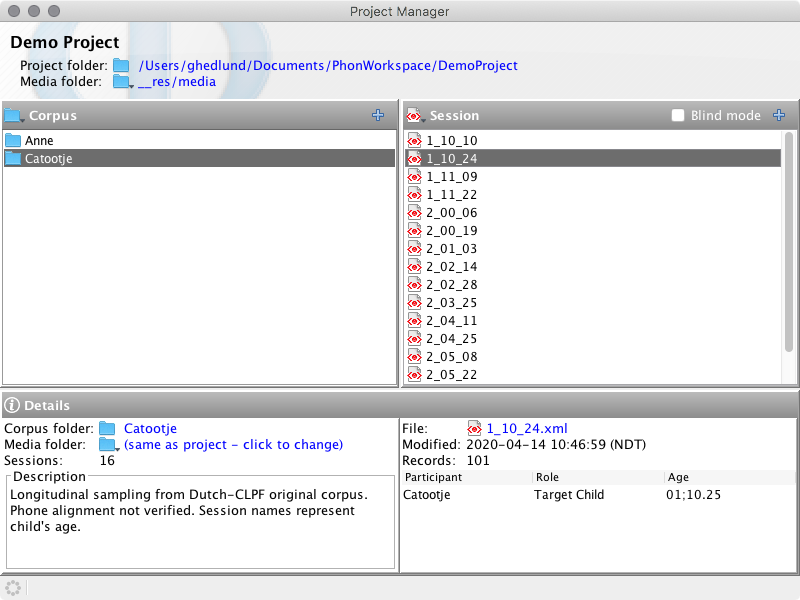
Phon projects are stored on a hard drive as directories. This folder is displayed at the top of the Project Manager window (clicking the folder path will open Finder (macOS) or Explorer (windows) with the project folder selected.)
The directory for each project will contain the following:
- A project.xml file which contains the information Phon requires for the project.
- A series of folders which correspond to each of the project's
corpora (usually a collection of transcribed sessions for
a specific target speaker). Project corpora are displayed in the left-hand list
of the window.
- Within each corpus folder are a series of xml files corresponding to each session. The xml files which are named beginning with '~' are session autosaves, created in order to prevent loss of data in the event of an unexpected shutdown.
The directory for each project may also contain the following:
- A project resources folder called '__res', which is a
system directory created by Phon to contain useful components for the project.
This folder may contain:
- A media folder, which is the default location for the media for the project and may contain media segments exported from Phon.
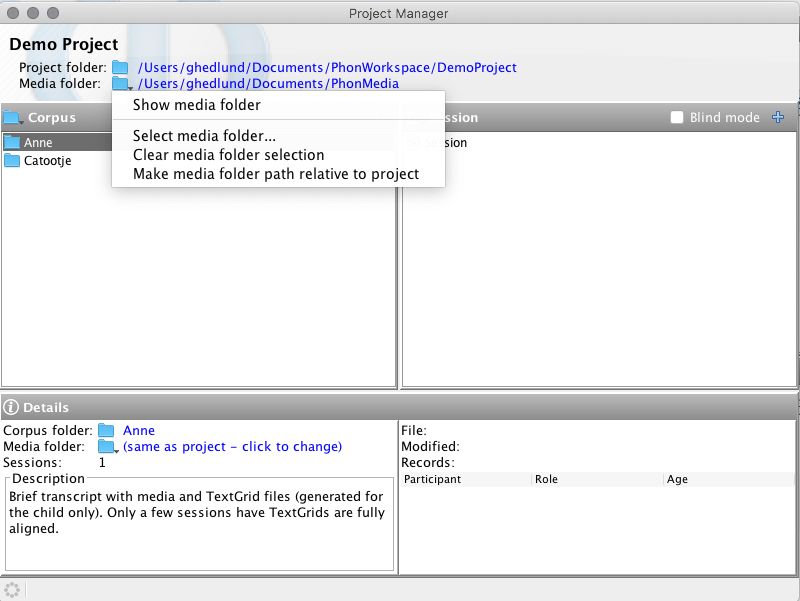
Project Media Folders
- Corpus media folder (if assigned)
- Project media folder
- Global media folders (see Media Folders)
To assign project media folders, select from the Project Manager window. A similar menu item is available for corpus media folders under the Corpus submenu. Actions for controlling media folder selection are available from popup menus accessed by clicking on the media folder labels at the top of the window and in the corpus details section.
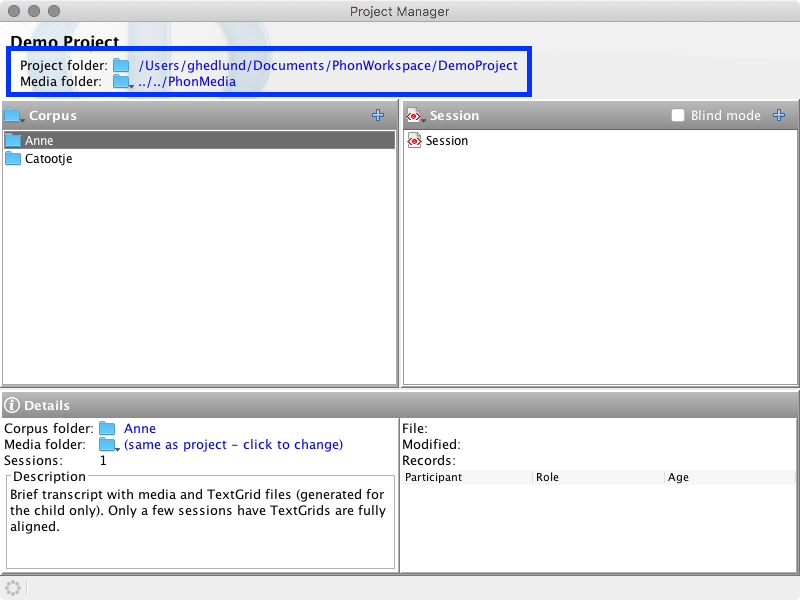
Relative Paths
Absolute paths are full paths to files/folders while relative paths are portions of a full path. On macOS absolute paths begin with a forward slash and on windows absolute paths begin with the drive letter.
Using relative paths for media folders can make sharing projects easier. By specifiying a common folder setup between project files and media folders for all people - e.g., using ~/Documents/PhonWorkspace for project files and ~/Documents/PhonMedia for media files - other users will not need to modify their individual media folder selections.
Project Actions
The following actions are available from the Project window menu when the Project Mangaer window is focused.
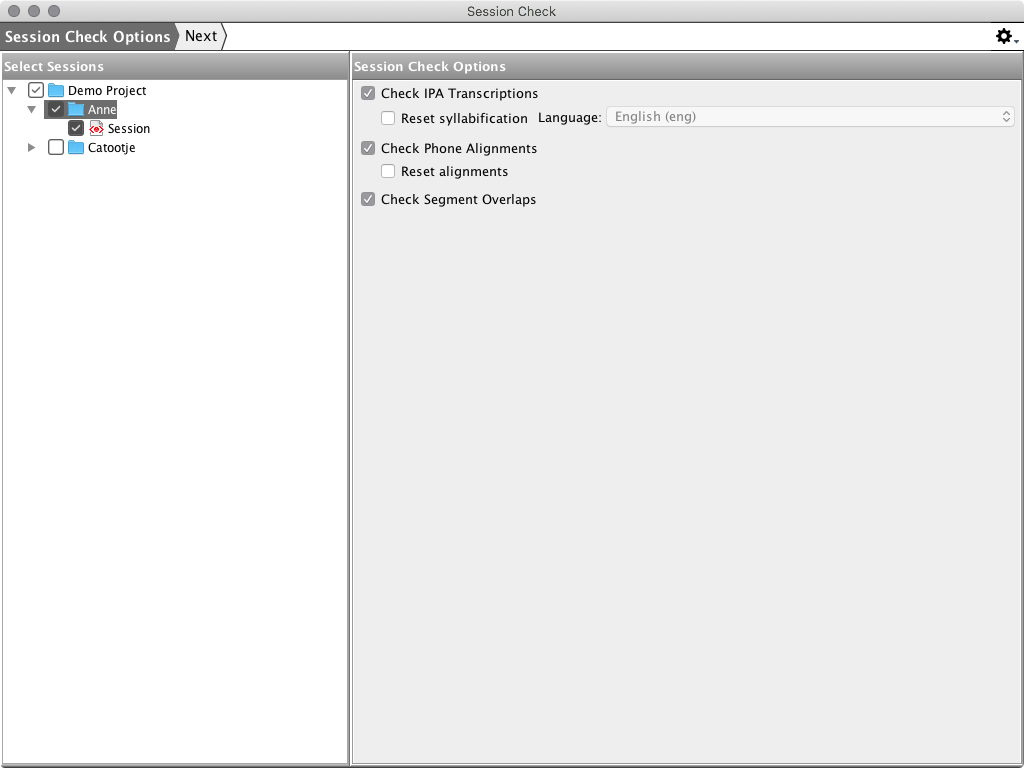
Check sessions
-
Select the menu item.
This will open the Check sessions window. -
Select the project, corpora, or sessions whose transcriptions you wish to check, and click Next.
Phon will check each selected session, and any phone transcription errors will be printed in red, with their corpus, session, record number, and tier (IPA Target or IPA Actual).Note:To resolve a reported error, return to the Project Manager window and open the session in which the error occurred, then navigate to the relevant record and visually check its IPA tiers.
Reset Syllabification
In the event of display issues in Target Syllables or Actual Syllables in the Syllabification & Alignment view, it may be necessary to reset the syllabification of IPA Target and IPA Actual transcriptions.
-
Select the menu item.
This will open the Check Sessions window. -
Select the Reset syllabification option.
-
Choose an appropriate syllabifier language by selecting it from the drop-down menu.
-
Select the project, or the corpora or sessions whose syllabification you wish to reset, and click Next.
Phon will re-perform the syllabification for each selected session using the syllabifier language chosen in the Preferences dialog.Note:After resetting syllabification or alignment, it will be necessary to visually verify these tiers.
Reset Phone Alignment
In the event of display issues in the Alignment tier of the Syllabification & Alignment view, it may be necessary to reset the phone alignment of IPA Target and IPA Actual transcriptions.
-
Select the menu item.
This will open the Check Sessions window. -
Select the Reset phone alignment option.
-
Select the project, corpora, or sessions whose alignment you wish to reset, and click Next.
Phon will re-perform the alignment for each selected session.Note:After resetting syllabification or alignment, it will be necessary to visually verify these tiers.
Derive Session
Derive a new session using records from existing sessions.
From the Project Manager window:
-
Choose the menu item.
A Merge Sessions dialog will appear. -
Enter a Session name and Destination Corpus in the provided fields. Select one or more of the sessions for the split or merge and click Next.
The second page of the Merge Sessions dialog will appear.Note:If you chose only one session, the selected records will be put into the new session. If you select more than one session, the selected records will be merged into a new session. -
Select a session from the Session list at the left and choose whether to merge or split All records, a subset of Specific records, Records for participant(s) or Records from Search results. Repeat this process for all sessions in the Session list. Click Next.
This will begin the merging of the selected records/sessions.Note:If you choose to merge only specific records, you will have to specify the relevant record numbers. To specify several individual records, separate them with a comma and a space. To specify a range, separate the beginning and end record numbers with two periods and a space. If you choose to merge records for specific participants, you must select the participants from the list. If you choose to merge records from search results, you must select a past search from the list. - The newly derived session will appear in the specified corpus in the Project Manager.
Refresh Project
Refresh Project Manager window to reflect changes.
-
Choose the menu item or press F5.
Import from CSV file(s)
Import a folder of CSV (comma-separated values) files into Phon as sessions.
The CSV import module can import a folder of CSV files with identical column formats into Phon. Where possible, CSV column labels should match Phon default tiers. Phon can automatically extract session date information from a CSV file if its name reflects its session date, in YYYY-MM-DD format.
From the Project Manager window:-
Select the menu item.
This action will generate a CSV Import window. -
Click the Browse button to the right of the Folder field and locate the directory containing the CSV files for import. Also, ensure you select the proper File encoding option from the drop-down menu. Click the Next button.
This action will prompt you to select files for import and the destination corpus. -
Enter a corpus name in the Destination Corpus field and using the check boxes, select the files for import into that corpus. For each file, edit Session Name and Session Date as desired by double-clicking on either of them. Click the Next button.
This will prompt you to set up the participants for that corpus: any participant information entered here will appear in all imported sessions for that corpus. -
Click the Add Participant/+ button at the right of the window. Enter participant name, sex, date of birth, language and other pertinent information in the appropriate fields and click Ok. To delete a participant from the import, highlight the participant in the table and use the Delete/Backspace key. Then click the Next button.
-
Set up column mapping such that each CSV column header has been assigned a tier name in Phon. To do this, highlight an item in the CSV column on the left, then use the drop down menu on the right to select the appropriate Phon Tier or enter a new tier into Tier Name field. You may also select the Don't Import menu item for columns that are repetitive or unnecessary. In the Options section, you may use the Syllabifier drop down menu to specify the correct syllabifier and the Transcription filter to convert the IPA Target and/or IPA Actual tiers from YAPA, SAMPA, IPAPhon or IPAKiel. Click the Next button.
This action will activate the import.Note:If the column name in the CSV file is the same as a Phon default tier name, the CSV column will be automatically mapped to the appropriate tier in Phon.Note:If mapping a CSV column to the Segment tier in Phon, segments times must be listed in mmm:ss.uuu format (minutes:seconds:milliseconds). -
Once the Import finished alert appears at the bottom of the CSV Import window, click the Close button.
This action will return the user to the Project Manager window with the newly imported corpus. Each row from your CSV file will become one record in Phon with the tiers as specified.
After import, each CSV file should become a new session in Phon. The number of records in the session should match the number of rows in the CSV file (minus the header.) A file named importsettings.xml is also created in the source folder. If this file is present when the directory is selected in Step 1 the previous import settings are loaded (except for Syllabifier and Filter settings).
Export to CSV file(s)
Export Phon sessions as CSV (comma-separated values) files.
The CSV export module can export Phon sessions into a specified folder as UTF-8 encoded CSV files.
From the Project Manager window:
-
Select the menu item.
This action will generate a CSV Export window. -
To select the destination folder for the export, click the Browse for folder... button to the right of the Destination folder field, locate the desired folder and click Open. Select the sessions you would like to export using the check boxes at the left of the Sessions list. Click the Next button.
This action will prompt you to set up columns for the export. -
To add a column to the export, type its name in the provided field and press Enter or click Add column/+. To remove a tier from the list, select it and click the Remove Column/- button. To export a tier which is not available in the existing list, type
This action will activate the export.Tier:<tier name>in the provided field and click the Add Column/+ or press Enter. Click on any tier name in the list and use the up/down arrow buttons to change the column ordering. Click the Next button.Note:The default column list for export includes: Session Name, Record #, and all default Phon tiers. The default can be restored by using the Reset to default button on the bottom right corner of the column list. This list of columns is saved after export and re-loaded the next time CSV export is opened.Note:To export blind user transcriptions, add the tierIPA [Target|Actual] (<username>)(e.g. Tier:IPA Target (JSmith)). -
Once the Export complete alert appears at the bottom of the CSV Export window, click the Close button.
Session files for all corpora in the exported project will appear in the chosen directory with the format Corpus name-Session name.csv.
Copy Corpus
Copy a corpus to a different project.
-
Select the corpora you wish to copy in the source Project Manager window.
-
Using the mouse, drag the corpora over the corpus list of the destination Project Manager window.
The corpus folders will be copied into the destination project.
Copy Session
Copy a session to a different corpus.
-
Select the sessions you wish to copy in the Project Manager window.
-
Using the mouse, drag the sessions over the name of the destination corpus in the Project Manager window.
The sessions files will be copied into the destination corpus.