
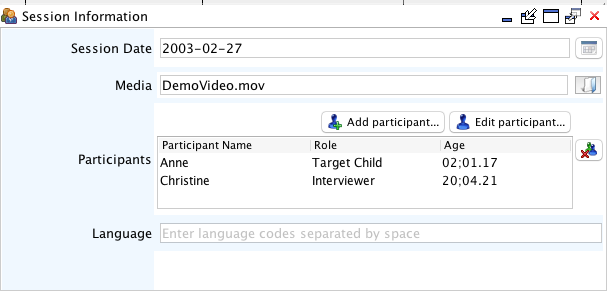
Session Information
The Session Information view displays and modifys the session date, media file, and list of participants.
Actions
Edit Session Date
Edit a session's date to reflect the date of its associated media recording.
-
Click on the existing Session Date and type the new date over it.
Participants' ages will be calculated using their birthday and the session date.
Assign Media to Session
Link a media file to the corresponding session.
-
Click on the Browse button to the right of the Media field.
A Browse window will appear allowing you to search your file system for the desired media file. -
Locate and select the media file and click Open.
This action will return the user to the Session Editor, from which the Media File will be available.Note:The project resources folder is the default media location for an individual project ('__res/media'). Placing your media in this folder allows you to keep your project's media within the project folder, and allows Phon to display the media's filename in the Session Information view without specifying the full path to it.Note:You may set one or more default media folders in Phon. Media files stored in your default media folders can also be displayed without their full file path.
Add Participant
Add a new participant to a session.
From the Session Information view:
-
Click the Add Participant button at the right of the Participants field.
The Edit Participant window will appear. -
Enter the participants Name, Birthday, Language, Group, Gender, Education and Role. Click Ok.
Note:The age for each participant is calculated automatically based on the birth date and the session date. You must enter a birthday (or a best guess) such that the application will not calculate a negative age. -
Repeat Steps 1 and 2 for each participant.
Edit Participant
Edit a participant for a session.
-
Select an existing participant's name and click the Edit Participant button to the right.
The Edit Participant window will appear. -
Edit the participant's Name, Birthday, Language, Group, Gender, Education and Role as you see fit and click Ok.
Any changes to the participant's name or age will be reflected in the Session Information view.
Input Session Language
The main language for each session can be specified in the Language field in Session Information.
-
Select the menu item for a list of the ISO-639-3 language codes.
This will bring up the ISO-639-3 Language Codes window, which displays a list of languages and language codes which you can look through.Note:By default, the list is organized by language code. To sort by language name, click on the Language Name column heading. -
Find the desired language code. In the Session Information view, click in Language field and type language name or code.
Note:The search field in the ISO-639-3 Language Codes is case-sensitive.