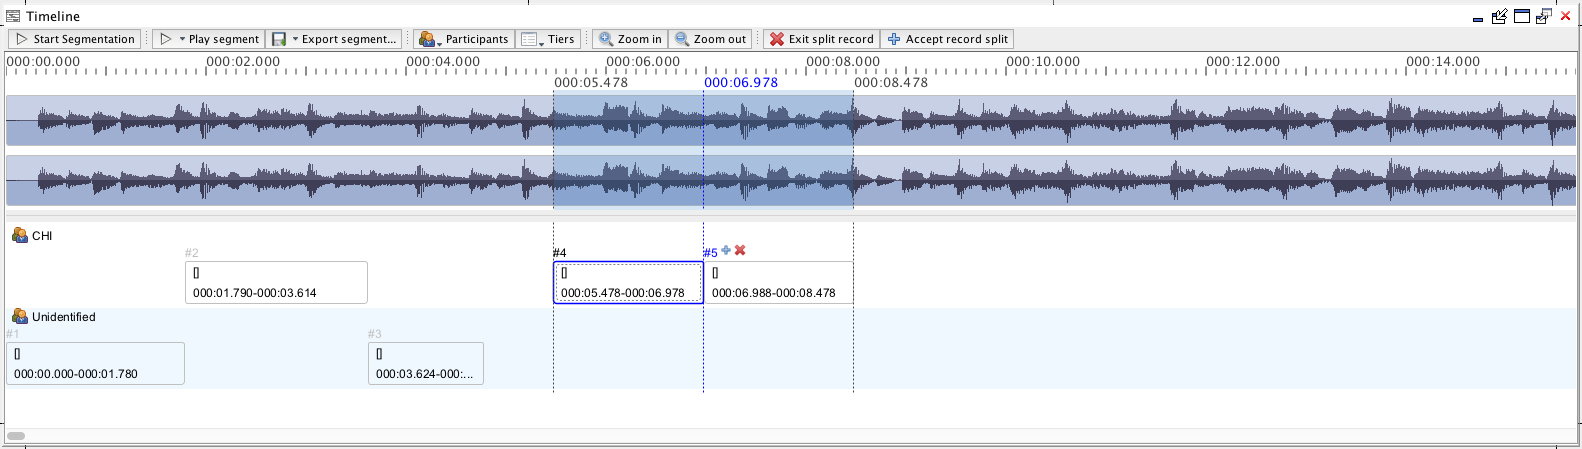
Timeline
The Timeline view displays the waveform for the session audio (when the audio file is available) as well as associated record data for each selected participant along a horizontal timeline. The primary purpose of the Timeline view is to aid with segmentation and alterations of existing record segments.
The Timeline view has three main components:
The timebar
The timebar is displayed at the top of the Timeline view and extends across the entire width of the view panel. Ticks are drawn every 10px with a major tick at every 100px. Time values are printed at every 2nd major tick.
The waveform
The waveform is displayed if session audio is available. If session audio is not available, a prompt to address the issue is displayed at the bottom of the view.
The record grid
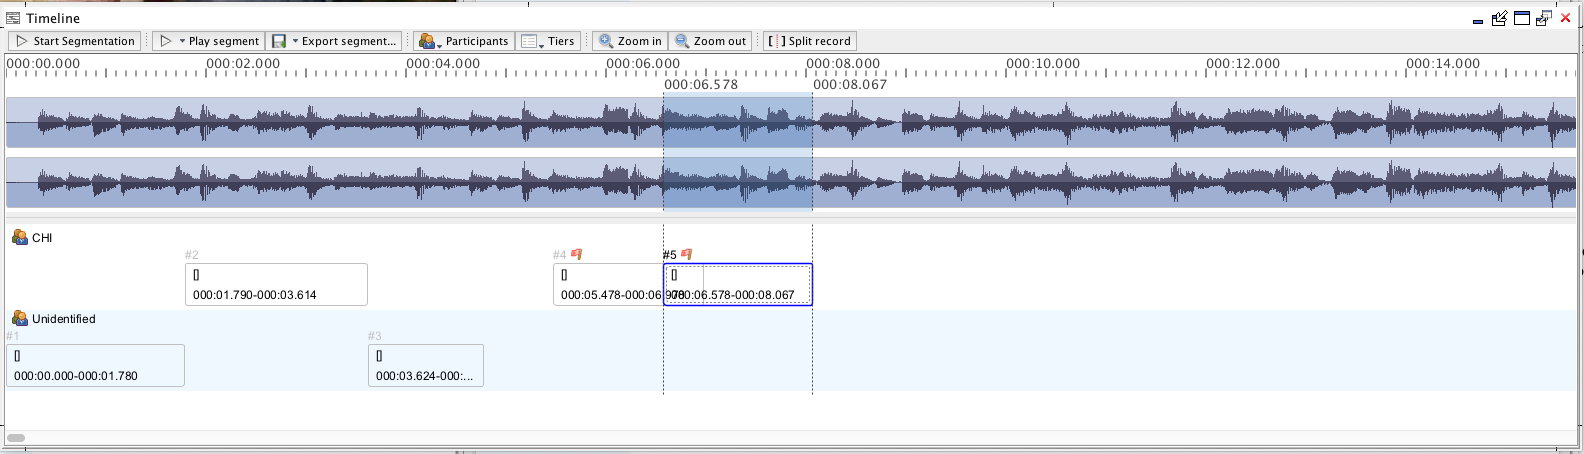
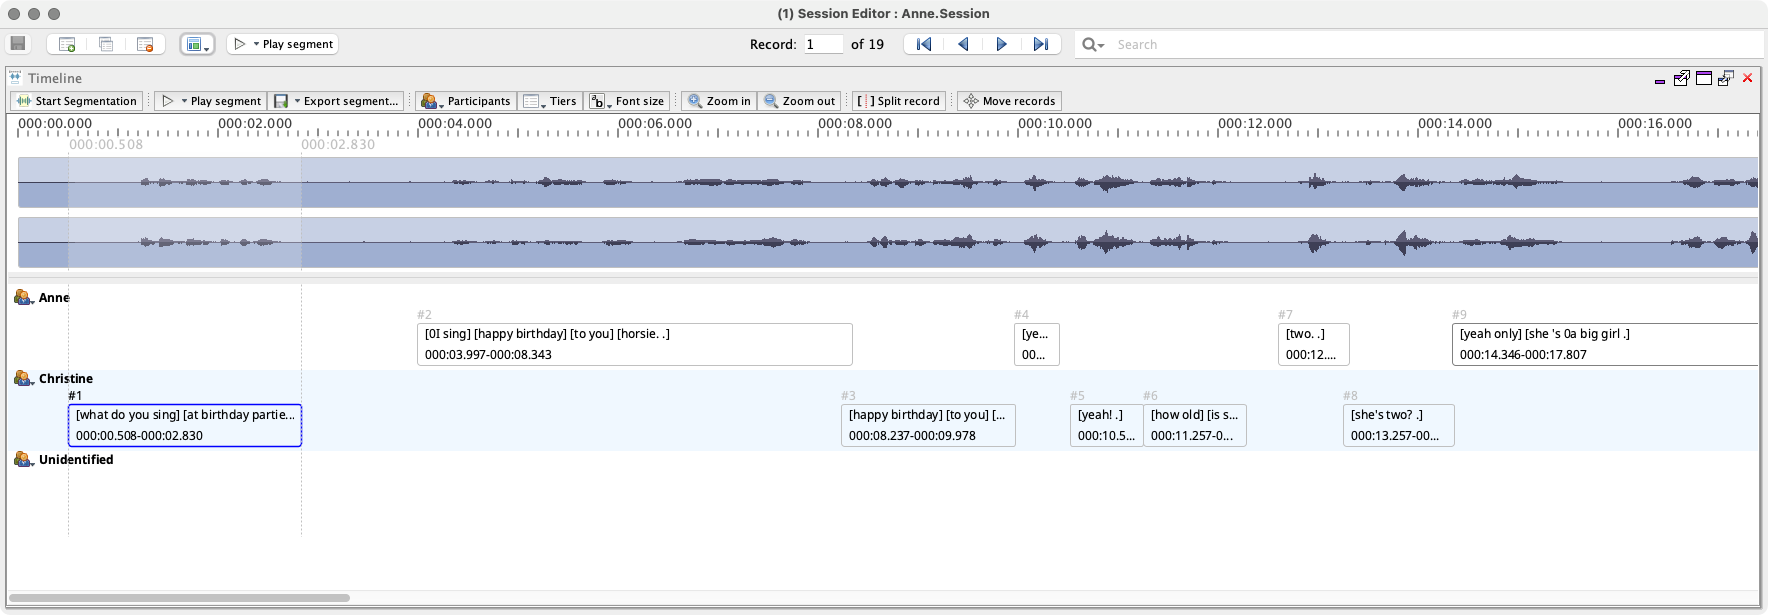
Records are displayed in dedicated rows for each speaker selected (from the Participants menu of the toolbar); for each record, the data tiers selected (from the Tiers menu) are visible. The current record is highlighted with a blue border, also with the record number printed in black. Record segments may be adjusted via mouse interaction by either dragging the record segment along the timeline; or by adjusting the start/end values using displayed markers (dotted lines). Records for any given participant can also be assigned to different participants by dragging the relevant record to a different row.
Actions
Play segment
To play the segment of the current record or selection press space (when not in segmentation mode) or use the menu in the toolbar or contextual menu.
Adjust segment times
Segment start and end times may be adjusted individually using the boundary markers (dotted lines) corresponding to the beginning and end of records. The start and end markers are always visible for the current record and are displayed when hovering over the end points of other record segments. Records may also be dragged horizontally along the timeline to adjust both start and end times simultaneously.
| Action | Keystroke(s) |
|---|---|
| Grow record | CMD/CTRL+G |
| Shrink record | CMD/CTRL+K |
| Move records left | CMD/CTRL+, |
| Move records right | CMD/CTRL+. |
| Move records... | CMD/CTRL+/ |
Delete record
To delete the current record select Delete record from the contextual menu or press Delete on the keyboard (after selecting the record to be deleted.)
Distribute unsegmented records
Distribute unsegmented records evenly across the space between existing records while maintaining record order.
Media Player Position
If the Media Player view is open, playback position can be changed by clicking on the waveform tier. If CMD/CTRL is held when clicking, playback will begin at the position marked by the click (if the media is not playing already).
Participants
Record data is printed by participant in rows. By default all participants plus a row for Unidentified records are visible.
Hide/Show Participant
Participant visiblity can be toggled using the Participants menu in the toolbar or option within the contextual menu.
Add Participant
To add a new participant to the session, click Add Participant in the Participants menu or select within the contextual menu.
Change Participant
Participant assignment for a record may be altered using the mouse by dragging the record segment up and down across the different rows of the record grid. You may also use CMD/CTRL + 1..9 to assign a different participant using the keyboard. Participant number is determined by position in the list of currently visible participants. CMD/CTRL + 0will set the record participant as Unidentified.
Reassign Records
Menu items to reassign all records from one participant to another are located in the contextual menu for participants available by clicking on the participant name in the record grid.
Hide/Show Tier
By default the Orthography and Segment tiers are shown in the record grid. Tier visibility may be toggled using the Tiers menu or similar option in the contextual menu.
Font Scaling
Font size can be adjusted using the Font size button in the toolbar. Clicking this button will display a popup menu allowing adjustment of font size in the record grid using a slider. This value will be remembered between instances of the Session Editor.
Zoom Out/In
The zoom out/in actions will decrease/increase the horizontal resolution of the waveform within the timeline. These actions are available in the toolbar and contextual menus.
Selecting Multiple Records
More than one record may be selected in the record grid. Selected records will be displayed with a blue border. The current record is always selected. Record selection can be manipulated using standard mouse and keyboard interactions (e.g., use CMD/CTRL+Click to add a record to the selection.) You may select all records for a speaker by clicking the speaker name and then Select all from the context menu.
Special Modes
Segmentation
Segmentation is the process of assigning segment times for records using the keyboard, usually while media is playing. To enter the Segmentation Mode, click the Start Segmentation button in the toolbar. Before segmentation begins, a dialog is displayed with options for media playback and segmentation behaviour. The Media Player view must be loaded within the Session Editor's interface.
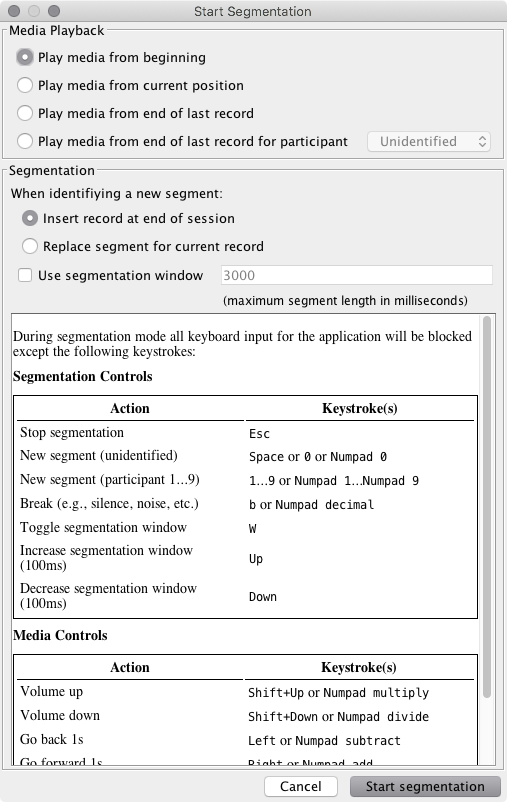
If session media is loaded the following media playback options are available:
Play media from beginning.
Play media from current position (in media player view.) This is the default option.
Play media from end of last record (by media time.)
Play media from end of last record for participant (with participant selection.)
Playback start position will determine where segmentation begins in the
Timeline. If no media is available segmentation will always begin at
000:00.000.
There are two modes available for segmentation:
Insert new record at end of session
Use this option when segmenting a new media file or continuing segmentation.
Replace segment for current record
Use this option when re-segmenting an already-segmented record or set of records. Uopn user action (e.g. typing a given participant number or 1, the current record is assigned the new segment time and participant (when relevant). Once all records segments have been overwritten using this mode, new records will be inserted at end of the session.
Segmentation Window
While segmentation mode is active, a yellow segment will be painted in the Timeline view. When a new record is identified using the Space or 1...9 or Numpad 1...Numpad 9 keys the segment identified by yellow will become the media segment for the new record.
If Use segmentation window is not selected, segments will have no set limit in length; the beginning time of the segment is constrained by the end time of the preceding segment. If Use segmentation window is selected, segment duration will be limited to a time value indicated in milliseconds (default is 3000ms or 3 seconds.)
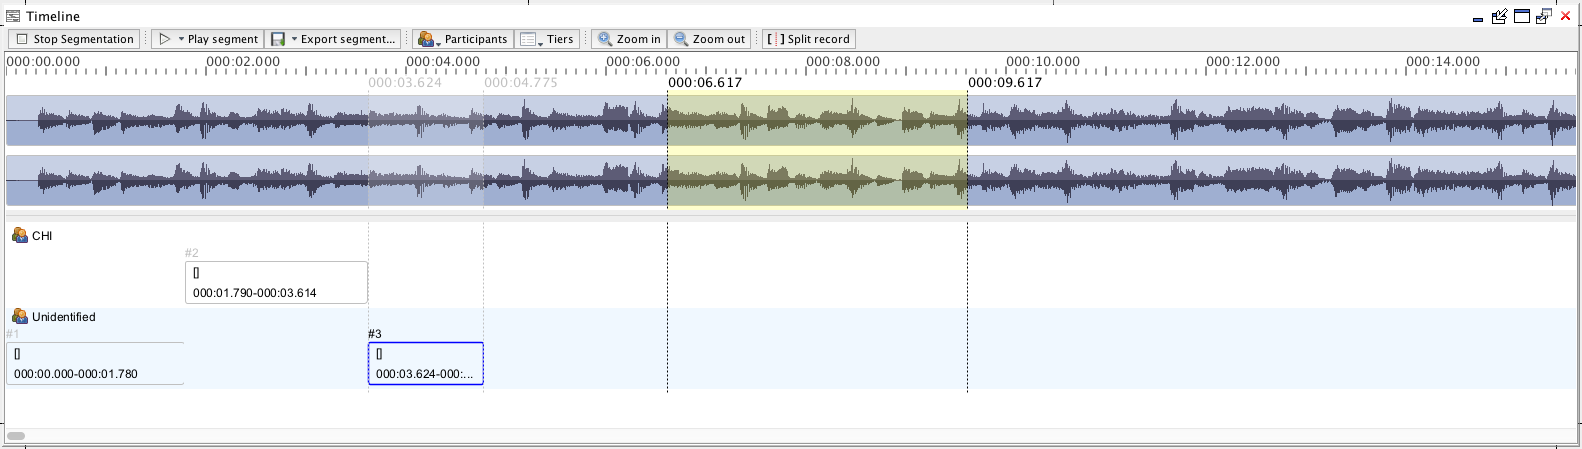
Segmentation Controls
During segmentation mode all keyboard input for the application will be blocked except the following keystrokes:
| Action | Keystroke(s) |
|---|---|
| Stop segmentation | Esc |
| Break (e.g., silence, noise, etc.) | b or Numpad decimal |
| New segment (unidentified) | Space or 0 or Numpad 0 |
| New segment (participant 1...9) | 1...9 or Numpad 1...Numpad 9 |
| Toggle segmentation window | W |
| Increase segmentation window (100ms) | Up |
| Decrease segmentation window (1000ms) | Down |
Media Controls
The following keystrokes for controlling media playback are avavilable when in segmentation mode:
| Action | Keystroke(s) |
|---|---|
| Volume up | Shift+Up or Numpad multiply |
| Volume down | Shift+Down or Numpad divide |
| Go back 1s | Left or Numpad subtract |
| Go forward 1s | Right or Numpad add |
| Go back 5s | Shift+Left or Shift+Numpad subtract |
| Go forward 5s | Shift+Right or Shift+Numpad add |
Split Record
Records segments may be split using the record grid. To enter split mode, select the segment to ne split, press the S key, press the "Split Record" button in the toolbar, or select Split record from the contextual menu. A new marker will appear in the middle of the current record segment. This new marker can be dragged to adjust the position of the record split. Press Enter to accept the record split as shown and create the new record. Split mode can be exited using the Escape key and will also exit if the current editor record is switched or the current record segment is modified.
Record data may be split by word group number by using the 0...9 keys on the keyboard. 0 will move all record data into the new record while 1...9 will split data after group 1, 2, etc,. Split position can be set using the context menu as well.
Warnings
The following warnings will be indicated in the Timeline view:
Overlaping segments
Segments exceeding media time
Warnings are indicated by a red flag shown next to the record numbers where warnings exist. Details about the warning will be shown in a tooltip displayed when hovering over the flag icon.